compound light microscope parts and functions worksheet pdf

Compound light microscopes are fundamental tools, essential for exploring the microscopic world.
This exploration involves understanding microscope parts and their functions, often reinforced through dedicated worksheets.
These PDF resources aid in mastering identification and application, crucial for biological and material science studies.
Low-prep, engaging practice is available, focusing on microscope parts and functions, ideal for review and assessment.
What is a Compound Light Microscope?
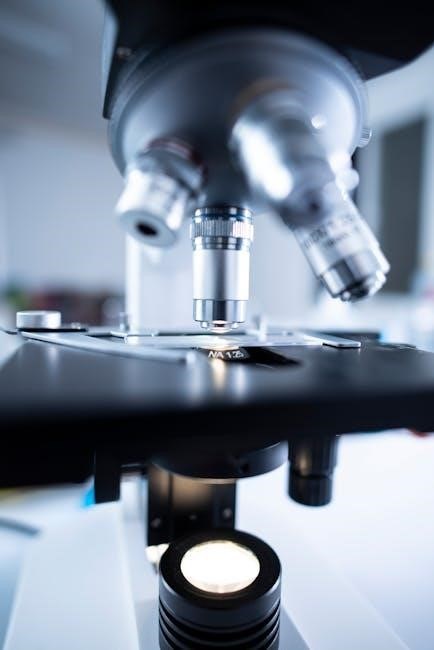
A compound light microscope is a precision instrument utilizing a system of lenses to magnify small specimens. Unlike simpler microscopes, it employs multiple lenses – objective and ocular – to achieve higher magnification levels, typically ranging from 40x to 1000x. This makes it invaluable for observing cells, tissues, and microorganisms.
Understanding the parts of this microscope is key to effective use. Many educational resources, including worksheets in PDF format, focus on identifying components like the objective lenses, stage, and condenser. These worksheets often include diagrams for labeling, reinforcing the connection between structure and function.
The “compound” aspect refers to the use of multiple lenses, while “light” signifies that illumination is transmitted through the specimen. Mastering the functions of each part, often aided by practice worksheets, is crucial for proper operation and obtaining clear, detailed images. These resources are designed to build a solid foundation in microscopy.
Historical Development of the Microscope
The journey of the microscope began in the late 16th century, with Zacharias Janssen credited with creating one of the earliest compound microscopes. However, these early iterations were rudimentary, lacking the precision of modern instruments. Antonie van Leeuwenhoek, in the 17th century, significantly advanced microscopy with his single-lens instruments, revealing the “animalcules” – microorganisms.
Over subsequent centuries, improvements in lens technology and illumination led to the development of the modern compound light microscope. Understanding its parts and functions became increasingly important, prompting the creation of educational materials.
Today, resources like worksheets, often available as PDF downloads, trace this historical progression while focusing on contemporary microscope anatomy. These worksheets help students connect the evolution of the instrument with its current capabilities, reinforcing knowledge of each part and its specific function. They demonstrate how centuries of innovation culminated in the tools we use today.

Key Parts of a Compound Light Microscope
Microscope parts are categorized into optical, mechanical, and illumination systems.
Worksheets, often in PDF format, detail each part’s function, aiding comprehension and identification.
Mastering these components is vital for effective microscopic observation.
Optical Components
Optical components are central to image formation within a compound light microscope. These include the objective lenses, the ocular lens (or eyepiece), and the condenser. Understanding their roles is crucial, and worksheets – frequently available as PDF downloads – are invaluable learning tools.
Objective lenses gather light from the specimen, magnifying the image. Different objectives provide varying levels of magnification, typically ranging from 4x to 100x. Worksheets often require students to identify these lenses and correlate magnification power with image detail. The ocular lens further magnifies the image produced by the objective, usually by 10x.
The condenser focuses light onto the specimen, controlling illumination and contrast. Proper condenser adjustment is vital for optimal image clarity. PDF-based worksheets frequently include exercises on condenser alignment and diaphragm control. These worksheets reinforce the interconnectedness of these optical components and their collective impact on image quality.
Objective Lenses
Objective lenses are arguably the most important optical components of a compound light microscope, directly influencing image magnification and resolution. Typically, microscopes feature a rotating nosepiece holding several objective lenses with varying powers – commonly 4x, 10x, 40x, and 100x.
Worksheets, often provided as PDF documents, frequently focus on identifying these lenses and understanding their magnification capabilities. Students are often tasked with calculating total magnification (see related sections) based on objective and ocular lens powers. The 100x objective usually requires immersion oil to enhance resolution.
These worksheets also emphasize the importance of selecting the appropriate objective lens for the specimen and desired level of detail. Exercises may involve matching objective lens power to appropriate applications, such as observing whole cells versus cellular structures; Mastering objective lens function is fundamental to effective microscopy.
Ocular Lens (Eyepiece)
The ocular lens, or eyepiece, is the lens through which the observer views the specimen. It typically magnifies the image formed by the objective lens, commonly at 10x magnification, though other powers are available. Worksheets dedicated to microscope parts and functions, often in PDF format, consistently require students to identify the ocular lens and state its magnification.
A key learning objective is understanding how the ocular lens works in conjunction with the objective lens to achieve total magnification. Exercises frequently involve calculating total magnification – a crucial skill for interpreting microscopic observations.
Some ocular lenses feature a pointer for easy identification of structures, while others have adjustable diopters to compensate for variations in individual eyesight. Worksheet activities may include labeling diagrams of the ocular lens and explaining its role in image formation.
Condenser
The condenser is a crucial component located beneath the stage, responsible for focusing the light onto the specimen. It concentrates the light, enhancing resolution and contrast. Microscope parts and functions worksheets, frequently available as PDF downloads, emphasize the condenser’s role in optimizing image clarity.
A key aspect of learning is understanding the adjustable condenser diaphragm, which controls the amount of light reaching the specimen. Proper adjustment is vital for achieving optimal illumination and revealing fine details. Worksheet exercises often involve explaining how adjusting the diaphragm affects image brightness and contrast.
Students are typically asked to identify the condenser on microscope diagrams and describe its function in relation to other components. Mastering the condenser’s operation is fundamental to effective microscopy and is consistently assessed through practical exercises and PDF-based learning materials.
Mechanical Components
Mechanical components provide the structural support and enable the manipulation of the microscope. These include the base, offering stability; the stage, where the specimen is placed; and stage clips, securing the slide. Microscope parts and functions worksheets, often in PDF format, heavily feature these elements.
Crucially, the coarse and fine focus knobs are essential for achieving a clear image. Worksheets frequently ask students to differentiate between their functions – the coarse knob for large adjustments and the fine knob for precise focusing. Identifying these parts on diagrams is a common exercise.
Understanding how these mechanical components interact is vital. PDF resources often include labeling exercises and questions about proper handling. Mastering these aspects is fundamental to successful microscopy and is consistently reinforced through practical application and dedicated worksheet activities.
Base
The base is the foundational support of the compound light microscope, providing stability during observation. Microscope parts and functions worksheets, commonly available as PDF downloads, invariably include the base as a key component to identify. Students are often asked to label diagrams, pinpointing its location and understanding its role.
Its primary function is to maintain a steady platform, preventing vibrations that could distort the image. Worksheet activities may explore the importance of a stable base for accurate microscopic work. Some PDF resources detail different base designs, though the core function remains consistent.
Understanding the base’s role is fundamental to appreciating the microscope’s overall structure. Worksheets often emphasize its connection to other mechanical components, illustrating how they work together. Correct identification and understanding of the base are essential skills reinforced through practice and review.
Stage
The stage of a compound light microscope is the flat platform where specimens are placed for observation. Microscope parts and functions worksheets, frequently found as PDF documents, prominently feature the stage as a crucial element for students to identify and label. These worksheets often require matching the stage to its specific function within the microscope’s system;
Its primary role is to securely hold the slide in place, allowing for precise manipulation and focusing. Many worksheets include diagrams illustrating how the stage moves, enabling systematic scanning of the specimen. Understanding the stage’s mechanics is vital for effective microscopic analysis;
PDF resources often highlight the stage’s compatibility with stage clips, further emphasizing its role in specimen handling. Mastering the stage’s function is a core skill reinforced through practice and review on dedicated worksheets.
Stage Clips
Stage clips are metal components found on the stage of a compound light microscope, designed to securely hold microscope slides in place. Microscope parts and functions worksheets, often available as PDF downloads, consistently require students to identify and understand the purpose of these clips.
These worksheets frequently present diagrams where learners must label the stage clips and explain their function in relation to specimen stability. While some microscopes utilize a mechanical stage with holding mechanisms, many rely on these simple, yet effective, clips.
PDF resources emphasize that stage clips prevent the slide from moving during observation, ensuring a clear and focused image. Activities within these worksheets may involve matching the stage clips to their role in maintaining specimen position. Understanding their function is fundamental to successful microscopy.
Coarse and Fine Focus Knobs
Coarse and fine focus knobs are essential control mechanisms on a compound light microscope, responsible for achieving a clear image. Microscope parts and functions worksheets, commonly found as PDF documents, heavily emphasize understanding their distinct roles.
These worksheets often include labeling exercises where students identify both knobs and describe their respective functions. The coarse focus knob allows for large-scale adjustments, bringing the specimen into approximate focus, while the fine focus knob enables precise adjustments for optimal clarity.
PDF resources highlight that improper use can damage the microscope or the slide. Activities within these worksheets may involve sequencing the correct order of knob usage during focusing. Mastering these controls is crucial for accurate observation and is a key component of microscopy education.
Illumination Components
Illumination components are vital for visualizing specimens under a compound light microscope. These parts, including the light source and diaphragm, are frequently featured in microscope parts and functions worksheets, often available as PDF downloads.
Worksheets typically require students to identify these components and explain their roles. The light source provides the illumination necessary to see the sample, while the diaphragm controls the amount of light reaching the specimen, influencing contrast and resolution.
PDF resources often include diagrams where students label these parts and answer questions about how adjusting the diaphragm affects image quality. Understanding these illumination components is fundamental to proper microscope operation and is a core concept reinforced through these educational materials.
Light Source
The light source is a critical illumination component of a compound light microscope, providing the energy needed to visualize the specimen. Microscope parts and functions worksheets, commonly found as PDF documents, emphasize identifying and understanding its role.
These worksheets often ask students to describe the function of the light source – to illuminate the sample – and may include questions about different types of light sources used in microscopy, such as halogen or LED.

PDF resources frequently feature diagrams where students must label the light source and explain how its intensity affects image brightness. Mastering the light source’s function is essential for achieving optimal image clarity and is a key learning objective reinforced through these practical exercises.
Diaphragm
The diaphragm, an essential illumination component, controls the amount of light reaching the specimen in a compound light microscope. Microscope parts and functions worksheets, often available as PDF downloads, heavily feature this component.

These worksheets typically ask students to explain how adjusting the diaphragm impacts image contrast and depth of field. Questions often focus on the relationship between diaphragm opening size and image resolution.
PDF resources frequently include exercises where students predict how changing the diaphragm setting will affect the appearance of a specimen. Understanding the diaphragm’s function is crucial for optimizing image quality and is a core concept reinforced through these interactive learning materials. It’s a key part of mastering microscope parts and their functions.

Functions of Microscope Parts
Understanding each microscope part’s function is vital.
Worksheets, often in PDF format, reinforce learning through labeling and matching exercises.
These resources clarify how components work together.
Objective Lens Function & Magnification
Objective lenses are paramount, gathering light and forming the initial magnified image of the specimen. Their primary function is to enlarge the sample, providing varying levels of magnification – typically 4x, 10x, 40x, and 100x.
Higher magnification equates to greater detail resolution, but also a reduced field of view. Worksheets focusing on microscope parts often require students to identify objective lenses and correlate magnification power with image clarity.
PDF resources frequently include exercises where learners calculate total magnification (see section on Total Magnification). Understanding objective lens magnification is crucial for proper specimen observation and accurate scientific documentation. These worksheets help solidify this understanding, often through diagram labeling and matching exercises, ensuring students grasp the core principle of image enlargement.
The quality of the objective lens directly impacts image resolution and overall clarity, making it a critical component of the compound light microscope.
Ocular Lens Function & Total Magnification
The ocular lens, or eyepiece, magnifies the image created by the objective lens, bringing it into focus for the observer’s eye. Its typical magnification is 10x, though variations exist. The primary function of the ocular lens is to provide a comfortable viewing experience and further enlarge the specimen’s image.
Total magnification is calculated by multiplying the objective lens magnification by the ocular lens magnification. For example, a 40x objective combined with a 10x ocular yields 400x total magnification. Worksheets dedicated to microscope parts and functions frequently include exercises requiring students to calculate total magnification.
PDF resources often present scenarios where students must determine the appropriate objective and ocular lens combination to achieve a desired magnification level. Mastering this calculation is fundamental to effective microscopy. These worksheets reinforce this skill through practice problems and diagram-based assessments.
Understanding this relationship is key to interpreting microscopic observations.
Stage and Specimen Handling
The stage is the flat platform where the specimen slide is placed for observation. Proper specimen handling is crucial for clear imaging and preventing damage to both the slide and the microscope. Stage clips secure the slide in place, while mechanical stages allow for precise, controlled movement of the slide in both horizontal and vertical directions.
Worksheets focusing on microscope parts and functions often include diagrams requiring students to identify the stage and its components. PDF resources may present scenarios involving proper slide placement and manipulation techniques.
Careful handling prevents scratches and breakage. Students learn to center the specimen over the light source for optimal viewing. Exercises in these worksheets emphasize the importance of gentle movements and secure slide fixation. Understanding stage controls is essential for systematic observation and locating specific areas of interest within the specimen.
Focusing Mechanisms ⏤ Coarse vs. Fine
Achieving a clear image relies on mastering the coarse and fine focus knobs. The coarse focus knob makes large adjustments to the stage height, used initially to bring the specimen into approximate focus. It’s crucial to avoid over-adjustment, especially with high-power objectives, to prevent damage.
The fine focus knob allows for smaller, precise adjustments, sharpening the image for optimal clarity. Worksheets dedicated to microscope parts and functions frequently include exercises differentiating between these two mechanisms.
PDF resources often present scenarios requiring students to determine which knob to use in specific situations. Understanding the interplay between these controls is vital for accurate observation. Practice, reinforced through these worksheets, builds proficiency in achieving and maintaining a sharply focused image.

Using a Compound Light Microscope ⸺ A Practical Guide
Effective microscope use requires proper technique. Worksheets, often in PDF format, reinforce learning microscope parts and functions.
Mastering slide preparation and focusing is key to successful observation.
Preparing a Wet Mount Slide
Creating a wet mount is a foundational skill for microscope users, allowing observation of living specimens. Begin with a clean glass slide; this ensures optimal clarity. Place your sample – be it pond water, plant tissue, or other material – onto the slide’s surface.
Carefully add a drop of water to the specimen; this keeps it hydrated and visible. Gently lower a coverslip onto the water droplet at a 45-degree angle, avoiding air bubbles which can obstruct viewing.
Understanding microscope parts and their functions, often aided by a PDF worksheet, complements this process. These resources reinforce proper technique. Excess water can be removed with blotting paper. A well-prepared wet mount is crucial for clear observation and accurate analysis, enhancing learning about cellular structures.
Remember to label your slide for easy identification!
Proper Focusing Techniques
Achieving a clear image requires mastering focusing techniques. Start with the lowest power objective lens – typically 4x – and use the coarse focus knob to bring the specimen into approximate focus. This initial adjustment establishes a general plane of view.
Then, switch to a higher power objective (10x or 40x) and utilize the fine focus knob for precise adjustments. Avoid forcing the knobs; gentle turns yield the best results. Remember that higher magnification reduces depth of field, requiring more frequent fine-tuning.
Worksheets detailing microscope parts and functions (available as a PDF) can visually reinforce these steps; Proper illumination, adjusted via the diaphragm, also enhances clarity. Consistent practice is key to developing proficient focusing skills, essential for accurate observation.

Always begin with low power!
Calculating Total Magnification
Determining the total magnification is crucial for understanding image size. It’s calculated by multiplying the magnification power of the ocular lens (typically 10x) by the magnification power of the objective lens currently in use.
For example, if using a 40x objective lens with a 10x ocular lens, the total magnification is 400x (10 x 40 = 400). This indicates the specimen appears 400 times larger than its actual size.
Many compound light microscope worksheets, often available as a downloadable PDF, include exercises specifically designed to practice this calculation. Understanding this concept, alongside identifying microscope parts and their functions, is fundamental to microscopy.
Accurate magnification assessment is vital for scientific interpretation.

Compound Light Microscope Worksheet Resources (PDF Focus)
Numerous PDF worksheets enhance learning of microscope parts and functions.
These resources offer engaging activities, including labeling diagrams and matching exercises for effective review.
Types of Microscope Parts Worksheets
Microscope parts worksheets, often available as PDF downloads, come in diverse formats to cater to different learning styles. A common type focuses on basic identification – students label diagrams of a compound light microscope, pinpointing components like the objective lenses, ocular lens, stage, and diaphragm.
More advanced worksheets delve into the specific functions of each part. These might require students to explain how the coarse and fine focus knobs contribute to image clarity, or describe the role of the condenser in controlling illumination.
Another category presents matching exercises, pairing microscope parts with their corresponding descriptions. Some worksheets incorporate fill-in-the-blank questions, testing recall of key terminology. Interactive PDF versions may include drag-and-drop activities for a more engaging experience. These resources are invaluable for reinforcing understanding of the compound light microscope’s anatomy.
Worksheet Activities: Labeling Diagrams
Labeling diagrams is a cornerstone activity within compound light microscope worksheets, typically provided as PDF documents. These exercises present students with unlabeled illustrations of a microscope, challenging them to accurately identify key parts.
Commonly, students must label components such as the objective lenses, ocular lens (eyepiece), stage, stage clips, coarse and fine focus knobs, base, condenser, and light source. Variations include diagrams with word banks for support, or more advanced versions requiring recall without assistance.
Effective worksheets often include arrows pointing to specific areas, minimizing ambiguity. Some PDFs offer interactive labeling, allowing digital annotation. Successfully completing these activities demonstrates a student’s grasp of microscope anatomy and lays the foundation for understanding the functions of each component. This reinforces learning through visual recognition.
Worksheet Activities: Matching Functions to Parts
Matching functions to parts is a crucial exercise found in compound light microscope worksheets, often available as downloadable PDFs. These activities assess a student’s understanding of not just what the microscope parts are, but what they do.
Typically, a worksheet will present two columns: one listing microscope parts (e.g., objective lens, diaphragm, coarse focus knob) and the other detailing their corresponding functions (e.g., magnifies the specimen, controls light intensity, initial focusing). Students must accurately connect each part to its correct function.
Variations include multiple-choice formats or fill-in-the-blank exercises. More challenging PDFs may present scenarios requiring students to apply their knowledge – for example, “Which part would you adjust to increase brightness?” Mastering this connection between structure and function is vital for effective microscope use.